Packaging Your Experiments on Chameleon with Python-chi 1.0
Streamlining Chameleon Experiments with Enhanced Python Library
- Oct. 21, 2024 by
- Mark Powers
You're most likely already familiar with the web dashboard for using a Chameleon site or you prefer to use a CLI. Each interface has its own advantages and disadvantages. While it's easy to get started with the GUI, sometimes it's helpful to be able to write a shell script that does everything for you automatically. However, there is yet another interface to Chameleon, Python-chi, our official Python library for the Chameleon Infrastructure (CHI) that pairs with JupyterHub. With the power of Python-chi, you can easily write scripts to dynamically manage testbed resources.
Recently, we released Python-chi version 1.0, which was updated to include in-demand improvements based on feedback from our users. These changes include:
Improved typing - Before, our Python-chi methods were closely using the lower level OpenStack functions. These work differently for each service type, so making reservations returned dictionaries but creating an instance returned objects. Now, we've defined our own consistent Python types. This makes it much easier to put together a working script from the documentation rather than having to copy and paste from existing snippets, and you can more easily use auto-complete tools.
New modules - We added some new modules for important Chameleon services. The most interesting addition is the hardware module, which allows you to query the hardware browser and availability calendar together. For example, this would allow you to find nodes available immediately with a GPU, which you could pass directly into a new lease. There is also the new storage module, which lets you use both the shared file system and the object store.
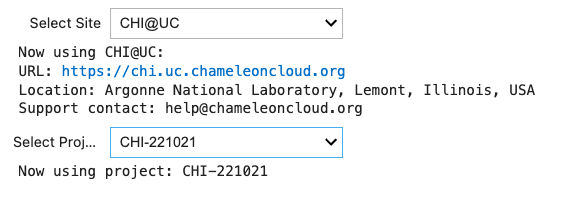
New widgets - One advantage of using Jupyter is the ability for a rich user interface. To improve the experience of using Python-chi in Jupyter, we've added brand new widgets. These include dropdown selectors for choosing a project and site, progress bars while waiting for leases and instances, and tables to display information about your resources. Not only are these nicer to look at than code, but they also help validate inputs – no more typos entering your project number!
Updated error messages - Errors on Chameleon can be confusing if you are unfamiliar with some of the internals of the testbed. We've updated Python-chi to differentiate types of errors: value errors, which are similar to 4xx HTTP codes, would indicate there is something wrong with the submitted request, such as a typo in the site name or node type. Resource errors indicate that requests are valid, but resources cannot be used as requested, such as your project having insufficient SUs, or nodes matching your reservation being unavailable. Lastly, we define service errors, similar to 5xx HTTP codes, indicating an unexpected error occurred, such as hardware failure with a node.
Easier low-level access - As you may know, Chameleon is built on OpenStack, which is the software that powers our cloud services. Python-chi is aimed to support 95% of Chameleon experiment workflows, but with the power of OpenStack, there is much more configuration you can do at a lower level. We've made it easier to switch from using our high-level Python-chi context to the OpenStack Python context via the client's module, including documentation for how to use each client. This may help with less common uses of Chameleon's resources, such as with Load Balancer as a Service or advanced networking.
If you want to get started with Python-chi 1.0, a great place to start is the updated Bare Metal Experiment Pattern Trovi Artifact (GitHub). This new notebook demonstrates how streamlined Python-chi 1.0 can be. We call this example an "experiment pattern," as we hope that it is mainly applicable as a basis for your experiment. To get started with this pattern, we recommend forking the GitHub repo and after committing any changes, importing the artifact to Trovi via Git. We've split the experiment process into five steps:
1. Query resources and make a lease.
2. Provision a single node
3. Copy experiment files and install dependencies
4. Run the experiment and upload the data
5. Analyze data
If your experiment is already on GitHub and requires a single bare metal node, you'll be able to jump to step 3 to point to your repository and potentially update the names of the setup scripts. If there are specific requirements for the type of node your experiment runs on, you can update the hardware query in step 1. You will also need to adapt the experiment execution and analysis steps 4 and 5, but we hope that our example will be a helpful starting point. For more complex experiment topologies, we encourage you to check out our documentation.
As always, if you have any questions or feedback, we are available via the Help Desk.
Cloud-Wrangling with Chameleon's Python Library
- March 15, 2021 by
- Jason Anderson
Chances are, if you're using Chameleon today, you're probably utilizing either the GUI or the CLI (or a mixture of both.) Did you know there's a Python library that makes it easy to script your Chameleon experiments? In January we announced the public release of python-chi, the official Python library for CHI (Chameleon Infrastructure), which is exactly that. Read on to learn all about python-chi and how to easily use it to experiment on Chameleon.
No comments